The art of creating with clay offers endless possibilities for creativity and expression. A pivotal aspect of this creative process is surface finishing, a step that can transform a simple clay object into a stunning masterpiece. Introduction to Clay Surface Finishing dives into the various techniques used to refine the surface of clay works, presenting an essential guide for both novices and seasoned potters.
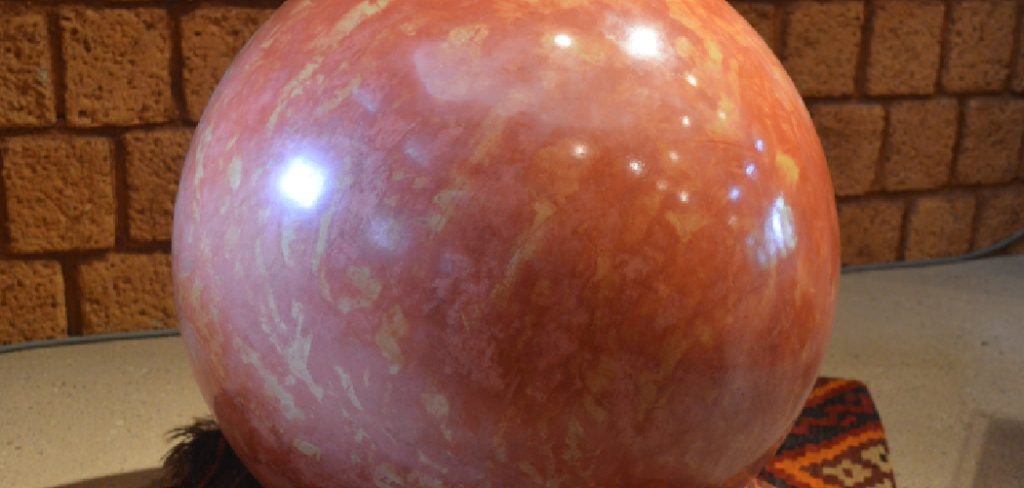
A Glossy Finish significantly enhances the aesthetic appeal of clay objects, providing a captivating shine that draws the eye and elevates the piece’s overall perception. Understanding how to make clay shiny involves a spectrum of methods, from traditional glazing to innovative sealing techniques.
This section highlights the importance of a glossy finish in clay artistry and provides a comprehensive Overview of Techniques for Achieving Shiny Clay Surfaces, equipping creators with the knowledge to explore and achieve remarkable gloss on their creations.
Choosing the Right Clay and Tools
The foundation of achieving a lustrous shine on your clay pieces lies in the initial selection of your materials. Clay Selection is paramount; not all clays are created equal regarding their ability to present a glossy finish. Clays like stoneware or porcelain are highly recommended for those seeking to achieve surfaces that gleam. These formulations, known for their smooth texture and high firing compatibility with glossy glazes, offer an optimal canvas for shiny finishes.
Moving on to Essential Tools, your toolkit can significantly influence the quality of your finish. Brushes of various sizes and shapes are indispensable for applying glazes and other surface treatments. They allow for precision in the application, ensuring even coverage that contributes to an unblemished shine. Sponges are useful for softening brush strokes and creating uniform surfaces pre-glaze while burnishing tools can polish the clay body to a smooth sheen, ready for glaze application.
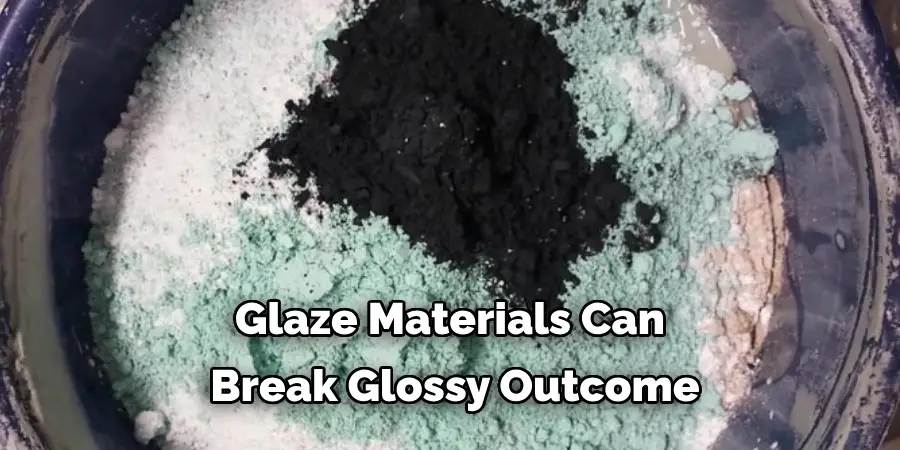
Additionally, choosing glaze materials can make or break the desired glossy outcome. Opt for glazes known for their clarity and brightness upon firing.
Finally, Optional Supplies can further enhance the glossiness of your clay objects. Sealants, waxes, or resins, applied after the final firing, can add an extra layer of shine and protection, making your pieces more visually striking and durable. While not necessary for every project, these materials can elevate the quality and appearance of your work, offering a glass-like finish that captivates and impresses.
By carefully choosing the right clay and equipping yourself with the necessary tools and optional supplies, you set the stage for creating clay pieces with exceptional glossy finishes that stand out in both beauty and quality.
How to Make Clay Shiny: Surface Preparation and Smoothing
Surface preparation and smoothing are critical to achieving a glossy finish on clay creations. This process lays the groundwork for glazing and other finishing techniques, ensuring that the final product is visually appealing and professional.
A. Smoothing Clay Surface:
The initial step in surface preparation involves smoothing the clay surface. This can be done through various techniques depending on the stage and style of the work. Hand-building techniques, such as coil building or slab construction, may require the use of ribs and rubber or wooden tools to compress and smooth surfaces. When throwing on the wheel, using water and a steady hand can help create a smooth surface. Sculpting tools can also refine the surface, removing marks and imperfections. The key is to ensure evenness across the surface, as bumps or depressions can become more pronounced after glazing.
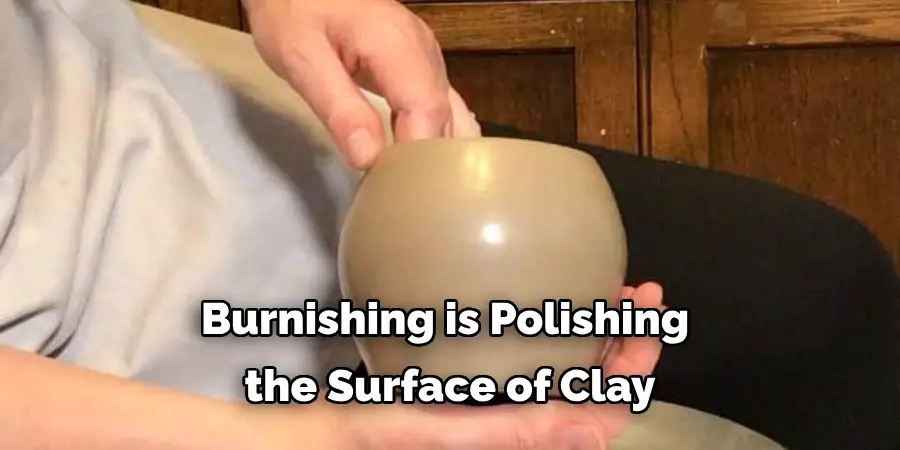
B. Burnishing:
Burnishing is the process of polishing the surface of clay, usually when it’s leather-hard or bone dry, using a smooth object like a pebble, a piece of glass, or a metal spoon. This technique compresses the clay particles, creating a denser surface that can begin to sheen even before any glaze is applied. The action should be gentle yet firm, covering all areas uniformly to avoid an uneven sheen. Water or a light slip can be used to reduce friction and facilitate the burnishing process, enhancing the smoothness and shine of the clay body.
C. Sanding:
After the clay object has been bisque-fired, small imperfections or rough spots may still be present on the surface. Sanding with fine-grit sandpaper can effectively remove these imperfections, creating a smooth surface that is ready for further finishing, like glazing or applying a sealant. It’s important to sand evenly and lightly to avoid creating new scratches or grooves in the surface. Always wear a dust mask to avoid inhaling clay particles during this process. Sanding sets the stage for a flawless finish, ensuring that glazes or sealants adhere evenly and contribute to the overall glossy aesthetic.
By meticulously preparing and smoothing the clay surface through these techniques, artists can significantly enhance the quality and appearance of their final pieces. This preparation is essential for achieving a high-gloss finish that accentuates the form and craftsmanship of the clay object.
How to Make Clay Shiny: Glazing Techniques
The act of glazing transforms the clay surface into a vibrant, glossy spectacle, serving as a crucial phase in the pottery and ceramics process. This section explores diverse glazing methodologies that significantly impact the finished piece’s aesthetic appeal and durability.
A. Applying Glaze:
Applying glaze onto a clay object can be achieved through various techniques, including brushing, dipping, or spraying. Brushing allows for precise control and is ideal for applying glazes in specific patterns or on smaller areas. For a more uniform and quicker coverage, dipping the entire piece into a glaze bucket is effective, ensuring a consistent layer across the surface.

On the other hand, spraying is suited for achieving an even coat over complex forms, though it requires specialized equipment and a ventilated area for safety. Each technique has its own set of advantages, and selection depends on the desired outcome and the specifics of the piece being glazed.
B. Multiple Layers:
Multiple layers can be applied to add depth and enrich the visual texture of the glaze. After applying the first layer, allowing it to dry thoroughly before adding the second layer is imperative. This process can be repeated several times, but caution is necessary to prevent the glaze from running off the piece during firing. The interplay between the layers can produce unique effects, enhancing the character and vibrancy of the piece. Each layer contributes to a more complex and rich finish, culminating in a profound visual depth and an eye-catching sheen.
C. High-Fire Glazes:
Glazes formulated for high-temperature firing (Cone 5 and above) are pivotal for achieving brighter colors and a more pronounced gloss. High-fire glazes are known for their durability and resistance to crazing (fine cracking), making them suitable for functional ware that demands robustness, such as dinnerware or outdoor sculptures. These glazes undergo a transformation at high temperatures, resulting in glossy surfaces that vividly accentuate the piece’s color.
The choice of high-fire glazes also expands the color palette available to the ceramist, offering hues and textures not achievable with low-fire options. Matching the glaze’s firing temperature with the clay body’s maturity temperature is crucial to ensure the best possible outcome.
Mastering glazing techniques requires patience and experimentation, allowing for endless possibilities in achieving a glossy finish that complements the clay artist’s vision. Through the strategic application of glaze, employing multiple layers, and selecting appropriate high-fire options, artists can significantly enhance their ceramic creations’ aesthetic and functional qualities.
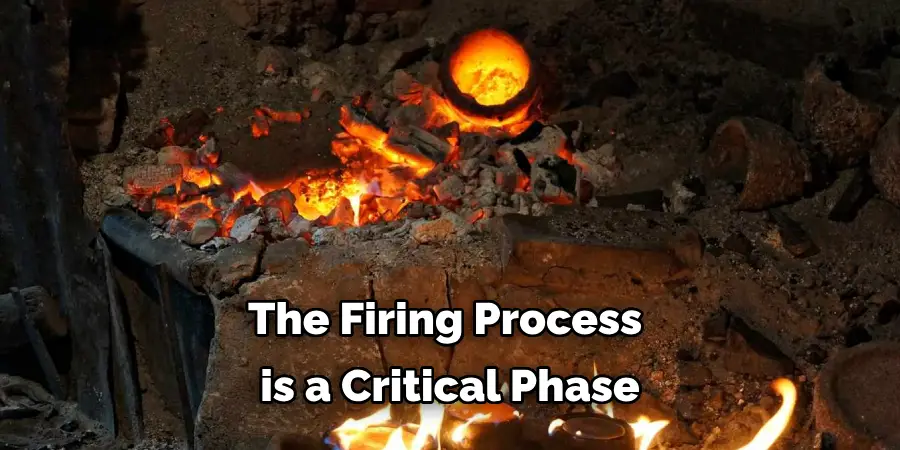
How to Make Clay Shiny: Firing Process
The firing process in pottery and ceramics is a critical phase where raw clay forms are transformed into durable and functional art pieces. This stage involves a series of carefully controlled heating cycles that significantly influence the final appearance and integrity of the work.
A. Bisque Firing:
Bisque firing marks the first major kiln operation where clay objects are subjected to lower temperatures, typically between 1000°C to 1100°C (1832°F to 2012°F). This initial firing hardens the clay, making it less fragile and more amenable to glazing. During bisque firing, chemical and physical water evaporate, and organic materials in the clay body burn out, preventing glaze defects in subsequent higher-temperature firings.
The porosity of bisque-fired ware allows for effective application and absorption of glazes, setting the groundwork for a successful glaze firing. The kiln atmosphere and ramping cycles must be meticulously managed to avoid thermal shock and ensure even maturation across all pieces.
B. Glaze Firing:
After the application of glaze, the second firing — glaze firing — is conducted. This step typically occurs at higher temperatures than bisque firing, often exceeding 1200°C (2192°F), depending on the glaze composition and the clay body. Glaze firing melts the glaze applied to the bisque ware, allowing it to fuse to the surface, forming a smooth, glassy coating that enhances the ceramic piece’s aesthetic and functional qualities. The temperature must be precisely controlled to enable the glaze to mature properly without running off the pottery or underfiring, which would result in a dull or improperly sealed surface.
C. Post-Firing Treatments:
Following glaze firing, additional decorative processes can be applied to further enhance the ceramic object’s visual appeal. Overglazes, such as gold or mother-of-pearl lusters, often add shine and ornamental detail. These materials are applied to the already glazed and fired piece, which is then subject to a third firing at a lower temperature — typically between 600°C to 800°C (1112°F to 1472°F).
This process allows the overglazes to adhere smoothly to the surface, producing a range of aesthetic effects from iridescent sheens to metallic finishes. The careful application of these post-firing treatments can significantly elevate the artwork, adding depth, complexity, and value.
The success of the firing process requires a deep understanding of the materials and techniques involved, as well as patience and attention to detail. Properly executed, it ensures that the final ceramic pieces are not only beautiful but also durable and functional, capable of withstanding the rigors of use while retaining their artistic integrity.
Alternative Finishing Methods
Beyond traditional glazing and firing techniques, alternative finishing methods offer ceramic artists additional ways to enhance the surface and durability of their creations. These techniques can be used independently or in conjunction with glazing to achieve a variety of textures and effects.
A. Polishing:
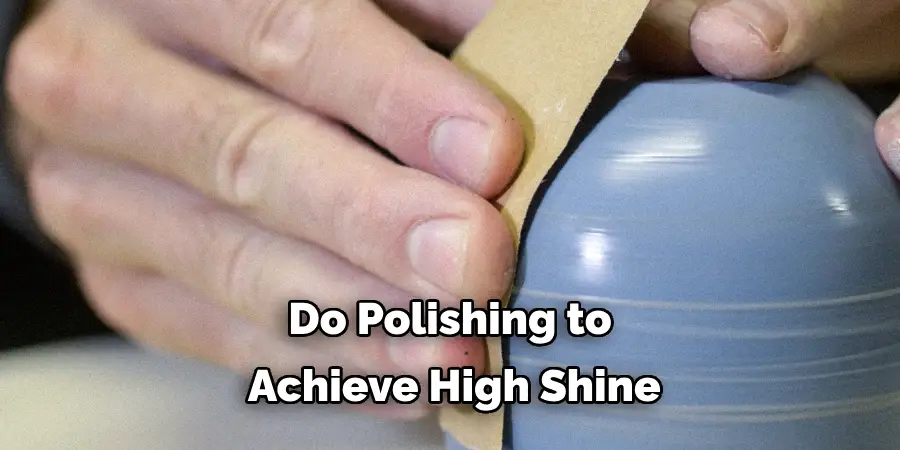
After the firing process, ceramic pieces can be polished to achieve a high shine without the use of glaze. This is done by applying polishing compounds, waxes, or oils to the fired clay surfaces. The polishing process involves buffing the surface with a soft cloth or a mechanical buffer, gradually building up to a glossy finish. This technique is particularly effective for highlighting the natural beauty of the clay body. It is often used in creating decorative items or sculptures where the tactile quality of the piece is as important as its visual appeal.
B. Resin Coating:
Another method to achieve a durable, glass-like finish is to apply a clear resin coating or sealant to clay surfaces. Once the ceramic piece has been fired and cooled, a resin layer is applied over the surface. The resin adds a high-gloss finish and acts as a protective layer, making the piece more resistant to moisture and wear. This method is suitable for both decorative and functional items, enhancing their visual impact and longevity.
C. Wax Resist:
The wax resist technique involves applying a layer of wax to certain areas of the clay body before glazing. When the piece is glazed and fired, the areas covered in wax resist the glaze, creating contrasts between glossy and matte finishes on the same piece. This method allows artists to achieve intricate patterns and designs, adding depth and interest to their ceramic works. Wax resist can be used in various ways, from simple decorative accents to complex, layered textures, making it a versatile tool in the ceramic artist’s repertoire.
Maintenance and Care
Proper maintenance and care are crucial for preserving the beauty and integrity of ceramic objects over time. By adhering to a few simple guidelines, collectors and users can ensure their cherished pieces withstand the test of time.
Ceramic pieces, particularly those with glossy surfaces, should be handled carefully to avoid scratches, chips, or cracks. Always lift these objects with both hands and avoid sliding them across surfaces that may be coarse. Wearing gloves can provide additional protection against skin oils and reduce the risk of dropping items due to slippery hands. When moving a piece, ensure it is not in contact with metal jewelry or keys that could potentially mar its finish.
Use a gentle soap and warm water solution to clean glossy surfaces without damaging them. Apply this solution with a soft, non-abrasive cloth, moving in gentle circles to avoid scratching the glaze. Rinse the item with clean water and dry immediately with a soft towel, ensuring no soap residue or water spots remain. Avoid using harsh chemicals, abrasive cleaners, or rough scouring pads that can etch the surface or degrade the glaze.
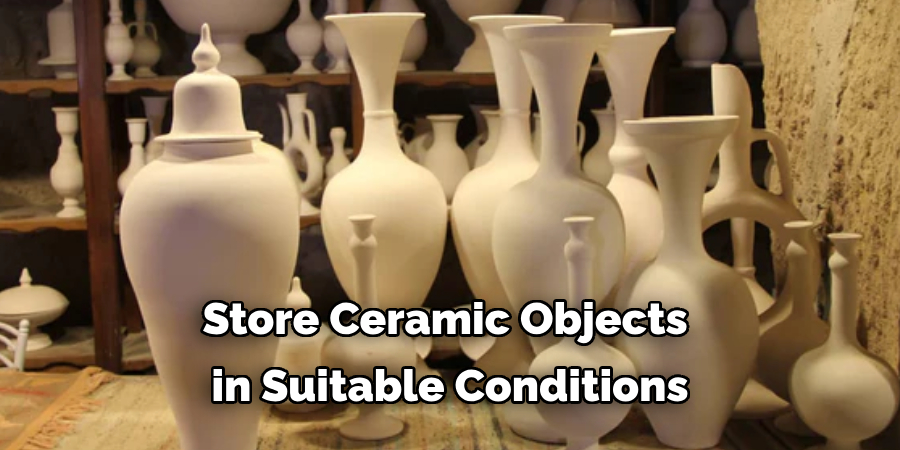
Storing ceramic objects in suitable conditions is essential to their preservation. Glossy surfaces can fade or become dull when exposed to direct sunlight for prolonged periods. Similarly, extreme temperature changes or humid environments can cause cracking or crazing in the glaze. Store these items in a controlled environment away from windows and direct heat or moisture sources to protect them. If displaying the piece, consider using a display cabinet that offers some protection from environmental factors.
Frequently Asked Questions (FAQ)
1. Can Ceramic Pieces Be Repaired if They Are Cracked or Broken?
Yes, ceramic pieces can often be repaired. Small cracks or chips can typically be mended using a strong adhesive designed for ceramic materials. Professional restoration might be necessary for more significant damage to ensure the repaired area matches the original piece’s strength and appearance.
2. How Can I Tell if A Ceramic Piece Is Suitable for Use with Food?
Ceramics intended for food use should be glazed with a food-safe glaze that is free of harmful chemicals such as lead and cadmium. It’s important to purchase these items from reputable sources that can confirm their safety for food use. If you’re unsure, using the piece for decorative purposes is safer.
3. Can Ceramic Items Go in The Dishwasher or Microwave?
Whether a ceramic item is dishwasher or microwave-safe depends on the materials used in its creation and the type of glaze. Generally, unless the manufacturer marks it as dishwasher and microwave safe, it’s best to handwash ceramic pieces and avoid microwave use to preserve their integrity and appearance.
4. Why Do Some Ceramic Pieces Develop a Crazed or Crackled Glaze Over Time?
Crazing, or the network of fine cracks on the surface of glazed ceramics, can occur due to a mismatch between the expansion rates of the clay body and the glaze or due to environmental factors like temperature changes. While crazing affects appearance, it does not necessarily compromise the piece’s structural integrity.
5. How Can I Prevent My Ceramic Pieces from Getting Scratched?
To prevent scratches, avoid using abrasive materials or cleaners on ceramic surfaces. Store and stack pieces carefully, using felt pads or cloth to separate items if they must be stacked. Additionally, avoid dragging ceramics across rough surfaces.
6. Are There Any Special Storage Considerations for Ceramic Pieces?
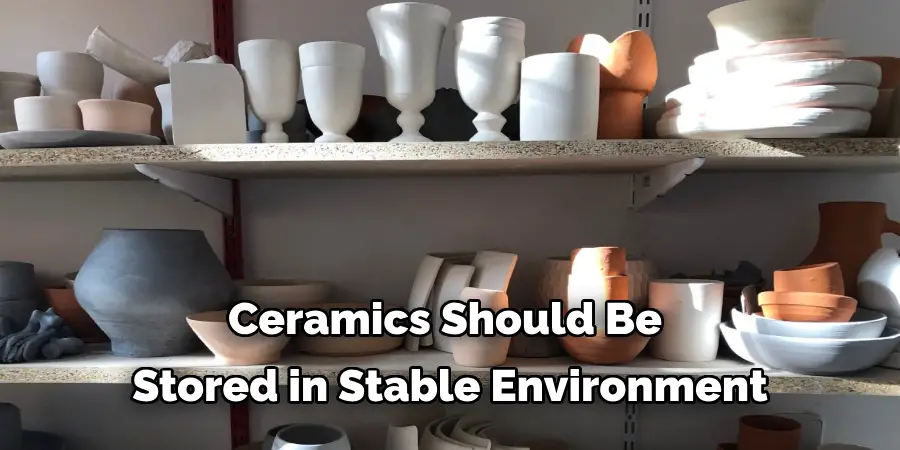
Ceramic pieces should be stored in a stable environment away from extreme temperature changes and direct sunlight, which could cause fading or thermal shock. For valuable or delicate items, consider storing them in padded boxes or display cabinets to protect against dust and accidental damage.
Conclusion
Throughout this guide, we have explored various techniques and tips on how to make clay shiny, emphasizing the importance of glazing, firing, and alternative finishing methods like polishing and resin coating. When executed correctly, these processes achieve aesthetically pleasing glossy surfaces and enhance the durability and functionality of ceramic pieces. The versatility and creativity in clay surface finishing allow artists to express their unique vision through various textures, effects, and designs. Encouraged to experiment and explore different methods, ceramic artists and enthusiasts can discover innovative ways to achieve the desired glossy effects on their clay objects. Combining traditional techniques with personal experimentation makes the possibilities for creating stunning, shiny clay surfaces limitless.
About the Author
Adrien Rowe, an expert in knitting, fiber arts, and bookbinding, promotes sustainability and creativity through workshops and tutorials. Passionate about education and community, he inspires crafters of all levels to learn, share, and grow in a supportive, idea-driven environment.
Professional Focus
Specializes in advanced knitting techniques, fiber manipulation, and textile innovation.
Expert in book arts, including cotton papermaking, handmade paper techniques, and bookbinding.
Dedicated to educating and inspiring crafters of all skill levels through tutorials, workshops, and hands-on learning experiences.
Passionate about creating a supportive community where makers can share ideas, learn, and grow.
Education History
Rhode Island School of Design (RISD) – Bachelor of Fine Arts (BFA) in Textiles.
University of Iowa Center for the Book – Master of Fine Arts (MFA) in Book Arts.
Expertise:
Advanced knitting, fiber manipulation, papermaking, bookbinding, sustainability-focused crafting, educational workshops, creative tutorials, and fostering a supportive maker community.